Free help: USER GUIDE
Home > Clients & Profits X User Guide > Setup > Task Table

|
Clients & Profits X Online User Guide |
Tasks are the basis for estimating, scheduling, job costing, billing, and job profitability reports
Since they serve so many functions, they’re very important. Your tasks are completely customizable. The tasks you add to your Task Table reflect the diversity of the work you do. That’s why no two companies have the same tasks. Tasks are flexible. Every job has at least one task, but may have dozens.
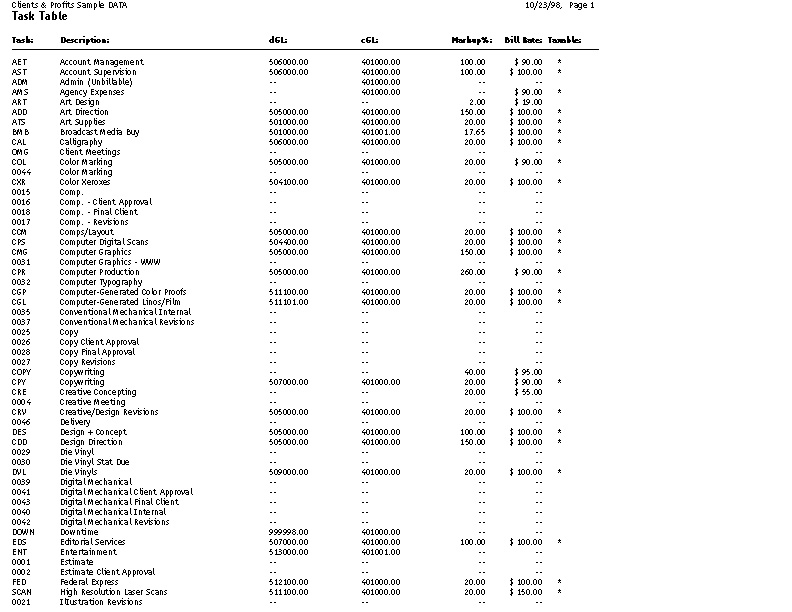
The task table is a central warehouse for every task you’ve ever used, or will use. The task table itself may contain hundreds of tasks. Each task has standard details, or defaults, that are copied to your jobs. This information, including sales tax settings, markups, and billing rates, automate much of your job tracking. You can add new tasks, make changes, or delete tasks anytime, for any reason.
A task is identified with up to a 4-letter code. The task code can contain any combination of letters or numbers (or both). Every task has a name that appears on estimates, invoices, and reports. Clients always see the name, not the code. Task codes are customizable.
To see the Task Table
1 Choose Setup > Task Table.

At first the Task Table only shows active tasks. Since tasks can’t be deleted if they exist on old jobs, you’ll eventually have a lot of obsolete tasks on the Task Table. These outdated tasks can be made inactive to keep them off the Lookup List and the task list. This helps prevents old tasks from being inadvertently used on new jobs. To see both active and inactive tasks, click the Show/Hide button.
Several tasks can be made inactive (or vice versa) by selecting them with your mouse, then clicking the button.
To add a new task to the Task Table
1 Click the add Task button, or choose Edit > Add New Task.
2 Enter the new task’s details, then click Save.
Once a new task is saved, it appears in the Task Table for others to see and use immediately.
To edit a task on the Task Table
1 Choose Setup > Task table, then click on a task to select it.
2 Click the edit Task button, or double-click on a task in the Task Table.

3 Make any changes to the task, then click Save.
Changing a task here doesn’t affect existing job tasks -- unless the “update existing tasks” option is checked. This option finds this task on all of your existing jobs, then changes the job tasks one-by-one. Don’t select this option unless you want task information on old jobs changed.
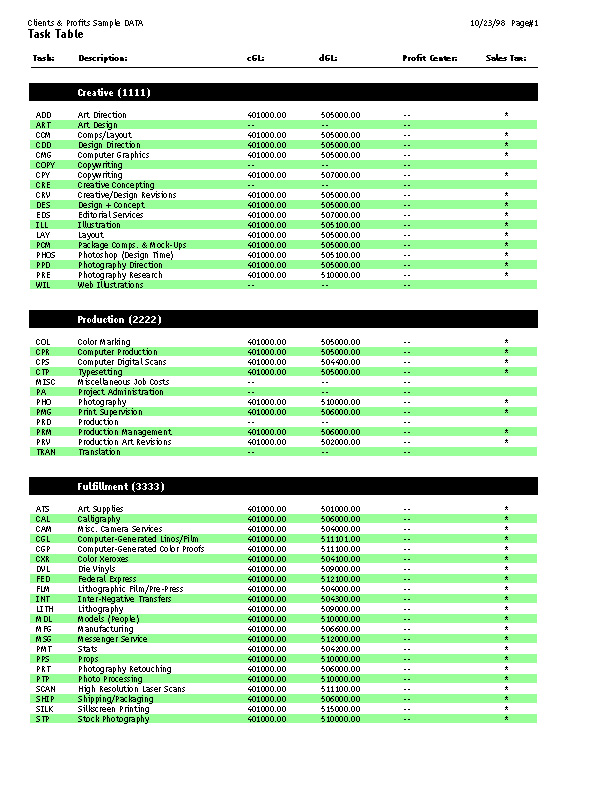
| cGL vs dGL The debit and credit accounts on your job tasks automate the financial accounting for job costs and client billing. These default accounts are copied from the Task Table when a new task is added to a job ticket. They are then copied to A/P and A/R invoices whenever you type in a job task then press Tab. They prevent data-entry errors that can make your financials less accurate, since cGLs (i.e., credit G/L accounts) and dGLs (i.e., debit G/L accounts) are set by default. They ensure that the same G/L accounts will be updated whenever a certain job task is used for costing or billing. (Plus, it's simpler for users since they don't have to decide which debit or credit G/L account to use for job costing and billing). The job task's cGL is copied to client invoices, and is an income G/L account. The job task's dGL is copied to vendor invoices and job cost checks, and represents a cost G/L account. |
| Sort and Sort on Schedule The sort number is used within groups on estimates and A/R invoices. Job tasks can be sorted differently on the job schedule with a sort number. In most cases, you would number tasks in the order in which the work is done. |
To delete a task from the Task Table
A task can be deleted from the Task Table as long as it isn’t used on any job.
1 Click on a task to select it.
2 Click the delete Task button, or choose Edit > Delete.
To print a task list
1 Click the print button, or choose File > Print Tasks.
Tasks will be arranged by group, then sorted alphabetically by task code.
A task list can also be printed from the task table lookup list. To print a task list from the Lookup List window, click the Print button. Tasks will be sorted in the same order as the Lookup List window (which you can change by clicking on the window’s column headings before printing), but without groups.
|
|
|
|
|
Learn how to edit tasks on job tickets
in this Clients & Profits classroom video training
session. Running time: 5:09 |
|
|
|