Free help: USER GUIDE
Home > Clients & Profits X User Guide > Production > Weekly Traffic Report

|
Clients & Profits X Online User Guide |
The Weekly Traffic Report window shows all traffic assignments in the shop, sorted by type of job.
The job’s traffic assignments, milestone headings, and traffic milestones appear in spreadsheet form on the Weekly Traffic Report window. Jobs can be selected for updating at random by clicking on the milestone you want to change. The new traffic information will replace the old in the Job Traffic Milestone window. When the report is updated, it can be instantly printed and distributed to the production and traffic staff.
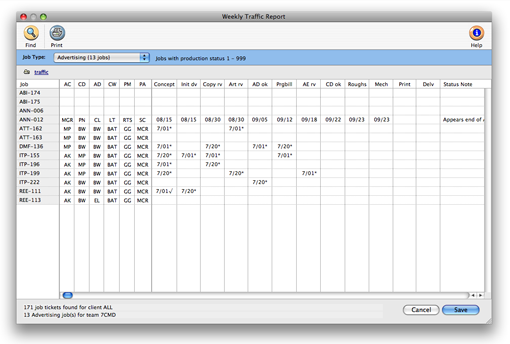
Information in the Weekly Traffic Report can be updated for each job, so you can quickly update the traffic for every job in the shop. You can also add more detailed information about the job using the Status and Traffic Notes.
|
|
|
|
|
Learn how to edit traffic information for many jobs at one time
in this Clients & Profits classroom video training
session. Running time: 5:14 |
|
|
|
The
Weekly Traffic Report window only shows jobs with job types. Also,
jobs will appear even if the job type/spec sheet has no traffic milestones.
Jobs without milestone headings should be skipped.
To use the weekly traffic report
1 Choose Production > Weekly Traffic
Report
The Find Job Tickets dialog box opens, prompting you to enter selections for
finding jobs.
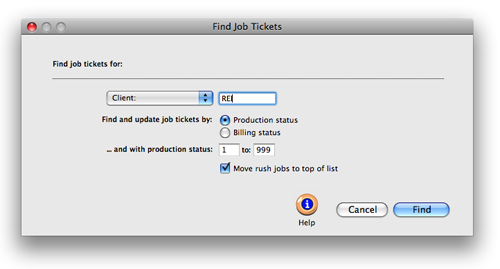
2 Choose a find option from the pop-up menu (e.g., client)
then enter a find value (e.g., client number).
Jobs can be selected by client, AE/team, and one of the traffic names
(e.g., creative director, account supervisor, etc.). This option
lets you find your own jobs (that is, if you’re initials were entered into a job’s assigned
to fields), for example, or all of the jobs for one client. To find all jobs,
enter the find value as “ALL”.
3 Select a status then enter a range of status codes, then
click Find.
Jobs can be selected by production or billing status, and any range
of status codes. This option lets you find only open jobs, for instance.
The jobs you’ve
selected are listed from the file server into the Update Traffic window. Jobs
are sorted by job number, but can be arranged by clicking on any column heading.
Jobs are grouped by job type to make it easy to analyze and update traffic information
for the same types of jobs (e.g., brochures, interactive, etc.). To see jobs
for a different job type, choose another job type from the Job Type pop-up menu.
4 Click once on a job’s first milestone to select it
for updating.
The job’s traffic assignments, milestone headings, and traffic milestones
appear in spreadsheet form on the window. Once selected, the job’s traffic
milestones and traffic assignments can be edited. Jobs can be selected for updating
at random by clicking on the milestone you want to change.
The new traffic information will replace the old in the Job Traffic window. The
next job is selected automatically, and can be updated by entering the new traffic
information.
5 Repeat step 4 for every job that needs updating, then click
Save.
To edit one job's traffic information
1 Click the Traffic button.
The Update Traffic window opens, prompting you to enter a job's milestones, production
and billing status, and traffic notes.
To print the weekly traffic report
1 Click the print button
or choose File > Print Weekly Traffic Report.
The Weekly Traffic Report is a wide report, so prints at 80% on an
8 1/2" x 11" sheet
of paper printed horizontally or at 100% on a legal-size sheet of paper.