Free help: USER GUIDE
Home > Clients & Profits X User Guide > Accounting > Automatic Job Billing

|
Clients & Profits X Online User Guide |
Clients & Profits provides an innovative feature that can dramatically simplify your billing, called auto-billing
Auto-billing creates invoices automatically for
all of your unbilled jobs. It’s the same result as if you’d
entered an invoice for each of your unbilled jobs. Instead, auto-billing
does the work for you.
The auto-billing process is simple: unbilled jobs are chosen by production
or billing status. Clients & Profits searches your job database for
every job with unbilled tasks -- and with the status you’ve selected.
Then an invoice is created automatically, including a line item for every
unbilled task on the job ticket. All of the appropriate job details are
copied to the invoices, so there’s no retyping.
Costs are billed automatically as invoices are saved. You can change
the billing amounts on job costs before the invoices are posted from
the Billing Worksheet window.
Jobs can be auto-billed by client or by project. Auto-billing one client’s
jobs makes it easy to make up the month’s billings quickly. Invoices
are numbered automatically, and are unposted. (The next invoice number
is used by default, but you can change it.) Once they are created, these
invoices can be added to, edited, or deleted any time until they are
posted. You can even bill all of the client’s jobs on one invoice.
|
|
|
|
|
Learn
more about automatic job billing
in this Clients & Profits classroom video training
session. Running time: 4:12 |
|
|
|
Auto-billing and the job’s status
Unbilled jobs can be selected for automatic billing by production
or billing status. This is a good reason to track jobs by
status, since it substantially automates your monthly invoicing.
If a job’s status
is updated whenever it is ready to bill, the work of figuring out which
jobs are billable is eliminated. You’ll always know which jobs are
ready to bill by the status.
Since job lists, job summaries, and work in progress reports
show jobs by billing status, your accounting staff can print
their own pre-billing reports. And using a billing status
doesn’t interfere with the production
department’s job tracking, since it’s completely separate.
Status codes are set up in the Status Table. You may not need many, but have one for Ready to Bill, Estimate billed, On-hold, and Final Billed/Closed.
Changing the job’s production or billing status is easy: From the Job Tickets window, find the job. Click on the Traffic button, then enter the job’s new status. Once these changes are saved, the job and its new status appear immediately on windows and reports.
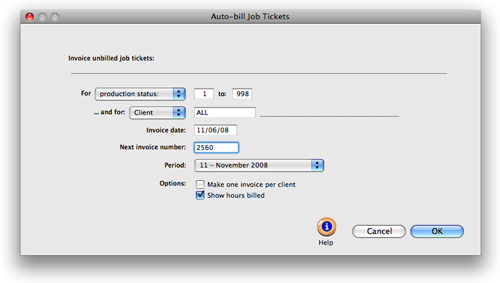
To create invoices with the Auto-bill Job Tickets function
1 Choose Edit > Auto-bill.
The Auto-bill Job Tickets window opens.
Invoices are created for unbilled jobs, based on your selections. Unlike estimate or progress/final billings, your options for showing unused tasks, using a percentage billing, etc. aren’t available. Automatic invoices are simple, but complete -- and can be changed as needed once they’re created.
2 Choose production status or billing status from the From pop-up menu, then enter a range of status codes.
Unbilled jobs can be selected for any range of status codes. Either production status or billing status can be used, depending on how your jobs are categorized. To bill all jobs with unbilled tasks, enter the status range of 0 to 999. This range of status codes will include jobs without a billing status. To only bill jobs with a specific status, enter a more limited range of status codes (e.g., 30 - 50).
3 Choose client or project from the and for pop-up menu, then enter a client number or project code.
Unbilled jobs can be selected for one client or project or all clients and all projects. This option lets you easily bill one client’s unbilled at the same time. It also gives you the option to easily bill one project’s jobs together on the same invoice.
To bill all jobs with unbilled costs for one client only, enter a status range then the client number. Only unbilled jobs open for the client will be automatically billed.
4 Enter the invoice date.
The invoice date is the date that appears on the printed invoice. The client sees this date as the date of the billing. It is used by the aging reports to calculate an invoice’s age (i.e., 30 days, 60 days, 90 days). The date defaults to today, but can be changed. It does not affect the posted date.
5 Enter the starting invoice number.
The next invoice number lets you set the numbering sequence for this batch of invoices. The next number, based on the last invoice, is entered automatically. If the last invoice number contained letters, the next number can’t increment -- and you’ll have to enter your own number.
6 Enter the invoice’s accounting period.
The accounting period determines into which month these invoices will be posted. You can select any period in the fiscal year unless it is locked (only the unlocked periods can be chosen).
7 Select the auto-billed invoices options.
Instead of creating a separate invoice for each job with unbilled amounts, the make one invoice per client option will combine the client’s jobs on one invoice. To show the hours billed on the printed invoices, select the Show hours billed option.
8 Click OK -- then wait while the invoices are automatically created.
The auto-bill function creates invoices by first compiling a list of unbilled jobs, based on your selections. The unbilled job’s tasks are analyzed, then invoice billing amounts are saved. These line items are then compiled together by job number to complete the finished invoices.
Automatic billing can be time consuming, especially if you’re selecting many jobs for billing. Invoices are created methodically, starting with the first unbilled job that it finds. The entire auto-billing procedure must finish completely or else the invoices will be incomplete. Since auto-billing is very demanding to your computer system (i.e., disk intensive), it’s best to bill jobs automatically during slow periods where few users are using Clients & Profits X. Other users on the network may notice slower performance on their systems when you’re auto-billing, especially if you’re billing many jobs.
If the auto-billing procedure stops for any reason (someone cancels it, system crash, power failure, etc.) then your invoices will be incomplete. In this situation, delete the auto-billed invoices (explained later) then repeat the auto-bill process.
Once the auto-bill invoices are saved, they can be proofed, posted, and printed just like regular invoices. In fact, they are no different. They can be deleted, appended, and edited any time until they are posted.
To delete unposted automatic billings
If, for any reason, the automatic billing didn’t do what you’d expected you can easily delete all of the auto-billed invoices then start the process over. The Delete All Unposted A/R command can be used to erase all of the auto-billed invoices at one time.
1 Choose Edit > Delete All Unposted A/R.
2 Click Yes when prompted.
Keep in mind that this command deletes all unposted invoices, not just automatic billings. If you have unposted job billings, estimate billings, etc., they will be erased, too. Don’t use the Delete All command unless you want to delete every unposted A/R invoice. Otherwise, you should delete the auto-billings individually.
Once invoices are posted, they can't be deleted. However, they can be unposted, changed, then posted again.
| Auto-bill one client’s jobs on the same invoice. The Auto-bill function will combine all of a client’s unbilled jobs together on a single invoice when the make one invoice option is selected. |