Free help: USER GUIDE
Home > Clients & Profits X User Guide > Setup > Edit Staff Member

|
Clients & Profits X Online User Guide |
The Staff file contains the company’s employees
If a staff member has time entries, his or her initials can't be edited. If these initials need to be changed, use the Renumber utility to renumber the staff member and all of his/her time sheets.
To edit a staff member
1 Find the staff member you wish to change.
2 Click the edit button (or choose Edit > Edit Staff).
The Edit Staff Member window opens, displaying the staff member's details.
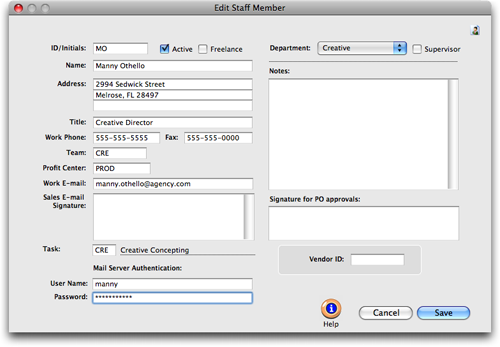
| Default Tasks The task you enter in the Task field for each staff member is the default task that appears when adding time cards or time sheets. If the staffer uses several different tasks, you can leave this field blank. |
In larger companies, staff members are usually organized into departments, such as account service, production/traffic, media, accounting, and administration. Clients & Profits X allows users to be grouped together into departments in the same way. Departments are indirectly used throughout Clients & Profits X. Every user can belong to one department, which is entered in the user’s General access privileges window. Learn more about setting up departments here.
3 Make your changes, then click Save.
Pasting a staff member's photo
Staff photos appear in a user's Information Center window when they log into Clients & Profits X. Graphics pasted into the Photo area of the Edit Staff window should be saved in PNG format.
Graphics should be 280 pixels wide and 240 pixels high at 72 dpi. The staff photo field size is very specific, so graphics that are pasted at sizes larger or smaller than this field size will automatically be scaled to fit the photo field.
1 Choose Setup > Staff
The Staff window opens, showing the last added staff member.
2 Use the previous and next buttons to locate the staff member you wish to add a photo for, then click the edit button.
The Edit Staff window opens, prompting you to edit details for this staff member.
3 Click the Photo icon ![]() located on the top right side of the window.
located on the top right side of the window.
The staff member's photo tray will appear to the right of the screen.
4 Click inside of the photo field, then choose Edit > Paste From File.
5 You will be prompted to find the graphic you wish to paste. Once you have located the graphic, click Open and the graphic will appear in the photo field.
If the graphic looks scaled or out of proportion, check the graphic's size to be sure that it's as close to the field's size specifications as possible and re-size the graphic as needed. Choose Edit > Clear to delete the graphic, and paste the graphic again.
6 When you are finished, click Save. Repeat these steps for remaining staff members.
To send authenticated e-mail
Some mail servers require a user name and password in order to send e-mail through them (an increasingly common anti-spam measure). C&P supports password authentication (not Kerberos or one of the other encrypted password methods). Mail server authentication information must be added for each individual staff member.
1 Find the staff member you wish to allow to e-mail.
2 Enter an email address in the Work E-mail field.
3 Under Mail Server Authentication, enter the user name and password.
4 When you are finished making changes, click Save.
Pasting a staff member's PO approval signature
PO approval signatures appear on printed Purchase Orders approved by staff members. Graphics pasted into the PO approval signature area of the Edit Staff window should be saved in PNG format. They can be scanned, then sized to fit the PO approval signature field size.
Graphics should be 855 pixels wide by 155 pixels high. This works out to a graphic that is roughly 3 inches wide by 1/2 inch high at 300 DPI. The PO signature field size is somewhat specific, so graphics that are pasted at sizes larger or smaller than this field size will automatically be scaled to fit the photo field.
1 Click inside of the Signature for PO Approvals field.
2 Choose Edit > Paste From File.
3 You will be prompted to find the graphic you wish to paste. Once you have located the graphic, click Open and the graphic will appear in the photo field.
If the graphic looks scaled or out of proportion, check the graphic's size to be sure that it's as close to the field's size specifications as possible and re-size the graphic as needed. Choose Edit > Clear to delete the graphic, and paste the graphic again.
4 When you are finished, click Save. Repeat these steps for remaining staff members.