Free help: USER GUIDE
Home > Clients & Profits X User Guide > Production > Job Scheduling

|
Clients & Profits X Online User Guide |
The ability to coordinate hundreds of jobs, tasks, and resources through a common job schedule is one of Clients & Profits X’ greatest strengths.
The Job Schedule window shows what
tasks need to be complete, when and by whom, in order to
get the job done. A job’s schedule helps make your
shop more productive. Using the built-in tools like the
calendar and reassign buttons, you can leverage staff
availability and talent by assigning tasks to specific
staffers. As jobs are completed, you’ll can generate
management reports for a complete analysis of your
shop’s productivity.
Like estimates, schedules are not created independently
of jobs. Instead -- like estimates -- schedules are based
on a job’s tasks. Every task on a job ticket can
have multiple due dates, start dates, and resources who
are responsible for doing the work, and specifications
that describe what to do. Anyone who needs to know can
see their work to do today, this week, next week -- or
for any period of time.
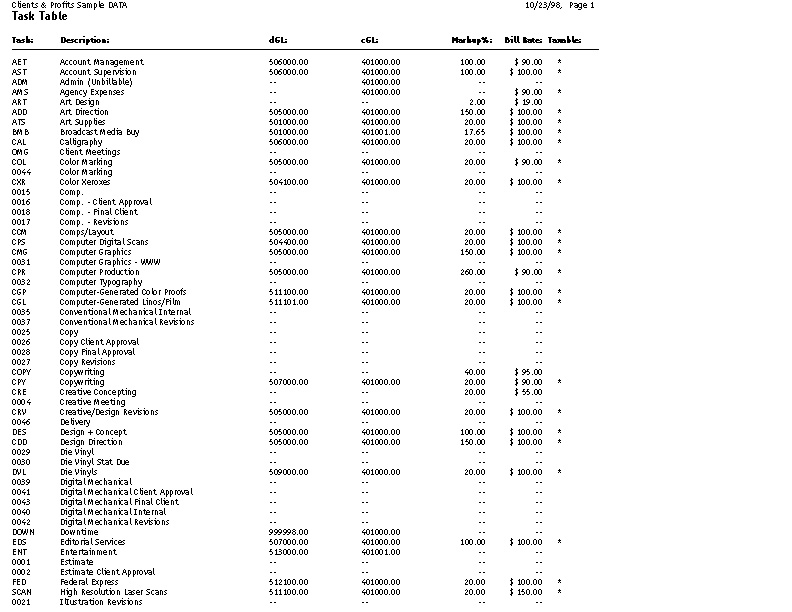
A job ticket can have any combination of job tasks. The
tasks you choose are completely customizable to
accommodate any kind of job. To better distinguish a job
task, it can be classified by its purpose:
Estimate/billing only, scheduling only, or both
estimate/billing and scheduling. In addition, sub-tasks
can be added to schedule different people to the same
task (such as assigning three copywriters to the COPY
task). Sub-tasks only appear on job schedules, and
don’t affect job costing, billing, or the accounting
system.
Job tasks can be scheduled automatically. A standard lead
time can be entered for every task, which is used to
create a ballpark job schedule. This ballpark schedule
looks at the sort order for each task, then automatically
schedules start and due dates based on lead time. A
production manager (or someone else who can schedule
jobs) can use automatic scheduling to automate much of
the basic task scheduling -- then tinker with the dates
until the schedule seems workable.
Email Reminders: Clients & Profits automatically sends an email on the day the job is due and on the day the job is actually started. The emails are sent to the resource/staffer who's staff initials are in the job's schedule. The only requirement is that the staffer must have an email address in their staff file.
Scheduling jobs is completely flexible. You can schedule job tasks
when a new job is opened, then print a job
schedule to attach to the client’s estimate. Or, schedule
tasks after the job is approved. Updating job schedules is simple,
so it’s easy to keep up with postponed deadlines as they happen.
Printing work-to-do
reports always uses the current job schedules, so you’ll always
have accurate, timely information.
A job can be scheduled anytime. However, scheduling a job when it
is first opened ensures that the work-to-do reports are accurate and
complete. Sometimes a rough schedule works well enough to start a
job. Task due dates can be fine-tuned as the schedule is refined over
time. Clients & Profits X checks due dates against company holidays,
which are entered in Preferences. For more information, see also the
Job
Scheduling FAQ.
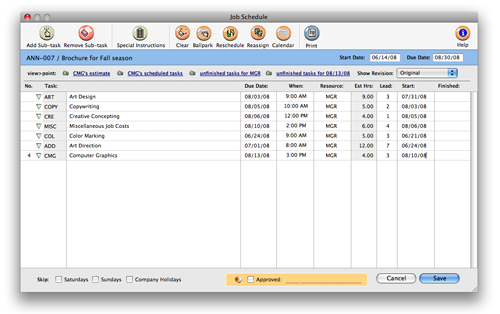
To schedule job tasks
1 From the Job Ticket window, find the job you
wish to schedule.
2 Click the Schedule
button.
The Job Schedule window opens, listing the job’s
scheduling tasks. These tasks appear, sorted by the
schedule sort order numbers. If no schedule sort numbers
are listed, the tasks are sorted by task code. As tasks
are scheduled, the list is resorted. Any task can be
selected for scheduling by clicking once on the task
name.
If a task isn’t appearing, make sure it isn’t marked as an estimate/billing task only.
3 Enter the task’s due date and time.
The due date can be entered as any day of the week, including Saturdays, Sundays, and holidays. The Skip option will prevent weekends from being scheduled.
4 Enter the task’s resource and lead time.
The resource is the person, place, or thing responsible for completing the task. It can be a staff member, a vendor, or a freelance employee. Staff Lookup lists can be used to find a staff member or vendor. The resource is not limited to existing staffers or vendors, so anything or anyone can be entered. The lead time should be entered as the number of days needed to complete this task.
5 Enter the task’s start date, then press Tab.
|
Get instant deadlines with ballpark schedules The Ballpark Schedule function calculates start dates and due dates automatically based on the job’s start or due date and each task’s lead time. The job’s ballpark schedule can be fine-tuned by simply editing its due dates. |
The start date is calculated based on
the task’s due date and lead time, but can be
changed.
6 Repeat these steps for the other job tasks, then
click Save.
Tasks do not get a finished date until they are complete and no longer need to appear on Work To Do reports.
To print a job schedule
A job schedule can be printed from the
Job Schedule window by clicking the Print button. The
printed schedule will list the job’s tasks by due
date. It will reflect the changes you’ve made to the
schedule but haven’t yet saved. If these changes
aren’t saved, the job’s previous due dates will
appear on the printed schedule the next time it is
printed.
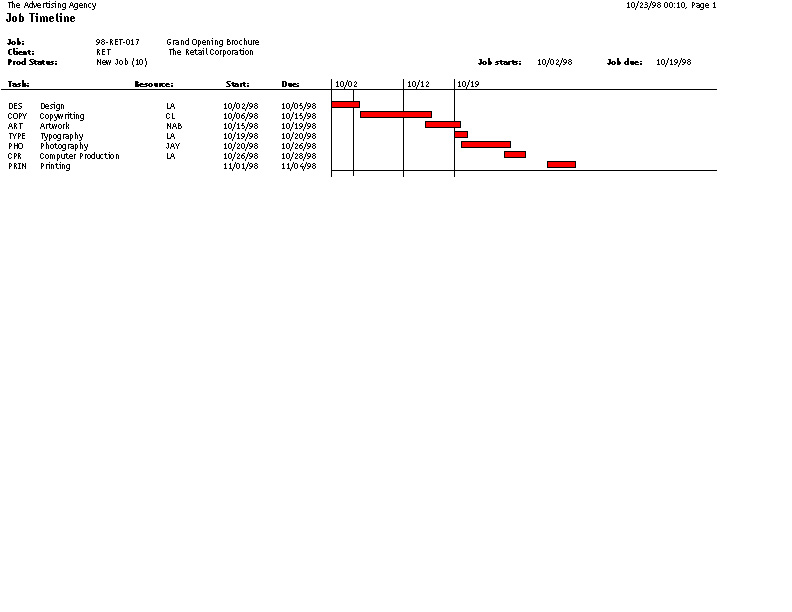
To print a job timeline
The Job
Timeline report provides a graphic look at the job’s schedule.
The job’s tasks are listed by due date and graph their relative
start and due dates by clicking the Timeline button. Timelines can
only be printed for one job at a time, and only from the Job Schedule
window.
To add a new job task while scheduling
New tasks can be added to a job ticket while editing
the job’s schedule. Tasks can be added by opening the Task
Table lookup list, selecting a task, then dragging it onto the
Job Schedule window. The task is instantly part of the job ticket.
|
Can they do this task? When a resource is scheduled for a job task, it’s easy to see their other deadlines. The View Unfinished Task window lists the resource’s other responsibilities for the week. You can analyze the resource’s workload to determine whether or not to add this task to their work to do list. |
To add a sub-task
Sub-tasks are special tasks used
exclusively for job scheduling. They are added to
schedule different people or multiple deadlines for the
same task. For example, the task COPY for copywriting
might involve several copywriters, proofreaders, and fact
checkers. Any number of sub-tasks can be added for COPY
to schedule due dates and resources for everyone
responsible for the job’s copywriting. Sub-tasks are
scheduled and updated like regular tasks. They appear on
work to do reports, but don’t affect estimates, job
costing, or billing.
1 Select the task (by clicking into any of its
fields) for which a sub-task will be added.
2 Click the add
Sub-Task button.
The sub-task is inserted beneath the selected task. The
sub-task gets the same task code, but the description can
(and should) be customized for this sub-task’s
purpose. Each sub-task can have its own resource, due
date, due time, lead time, and start date. Some portion
of the task’s estimated hours can be allocated to
the sub-task (e.g., 4 hours out of the COPY’s 12
estimated hours just for proofing). Many sub-tasks can be
added for each task. The total of the sub-tasks’
hours can’t exceed the task’s estimated hours.
To update a sub-task’s due date, etc.
The sub-task’s due date, start
date, task specifications, and finished date are updated
just like any other task: open the Job Schedule window,
select the sub-task, make your changes, then click Save.
Because sub-tasks only appear on the Job Schedule window,
they can’t be updated from time cards and time
sheets. However, sub-tasks will appear on the Weekly Task
Planner and Work To Do windows, where they can be
updated.
To remove a sub-task
Sub-tasks can be easily removed from
job schedules. To remove a sub-task, select it by
clicking into one of its fields then click the Remove
Sub-Task button.
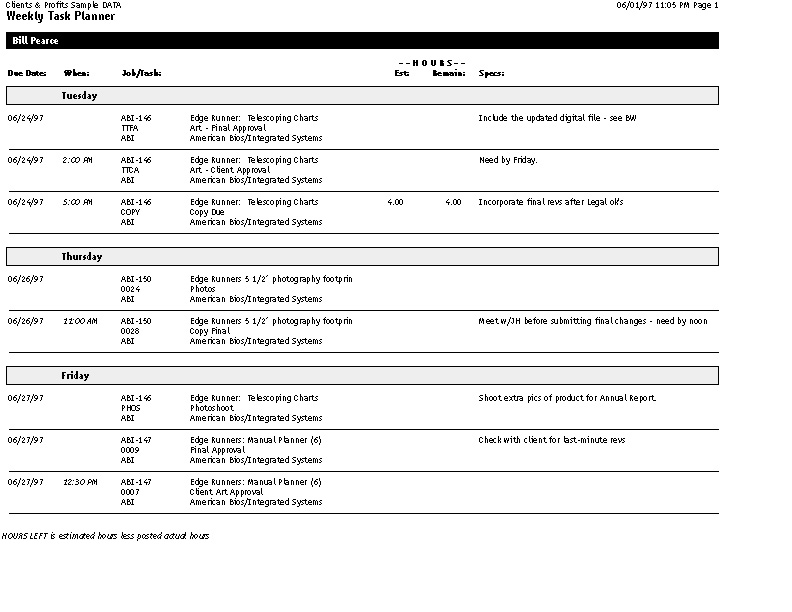
To edit a task’s specifications
Each scheduling task can contain detailed specifications
that describe the work to be done. These task specifications appear
on the resource’s printed work to do reports, as well as the
Weekly
Task Planner. They’re optional, but can be useful for documenting
the scope of the work, how it should be produced, or to explain any
special instructions. Clients don’t see task specifications on
estimates and invoices. To edit a task’s specifications, select
a task then click the Edit Task Specs button, make your changes, then
press Tab to save.
Tasks that have specifications are highlighted in the Job Schedule window with a red “X”.
To review a task’s estimate
It’s sometimes helpful when
scheduling a job to review the task’s estimate. To
see the task’s estimate, select a task then click
the Estimate button. The pop-up Estimate window shows the
task’s estimate amounts, including details from the
task’s estimate worksheet: staff members,estimated
hours, and expenses. In some cases certain people may
have been planned to work on a task, but are no longer
available. Or, the task might have been under-estimated,
so the production manager can assign junior (i.e., less
expensive) artists to the task.
The pop-up Estimate window lets you review the
task’s estimate amounts without closing the Job
Schedule window. You can see the information you need to
make a better, more informed schedule without having to
quit what you’re doing, reprint the job’s
estimate, then return to the Job Schedule window.
To clear a job’s schedule
The job’s entire schedule can be
erased with a single mouse click. Use this shortcut when
the schedule is wrong and needs to be created from
scratch. This shortcut is much faster than manually
deleting each task’s schedule information. To erase
the job’s schedule, click the Clear button.
|
Drag-and-drop job scheduling Clicking the Calendar button opens the job’s pop-up calendar window. Selecting a date in the calendar lists the day’s deadlines, keeping you informed of the day’s workload. Dragging a date from the calendar to the job schedule’s due date or start date field schedules the task. Company holidays appear in green. |
To create a ballpark schedule
Ballpark schedules can be created
automatically using the job’s start date or due
date. The ballpark function looks at the job’s
tasks, evaluating which tasks are finished first (based
on their schedule sort order) and lead time. A user can
choose whether to work forward from the start date or
backward from the due date. Either way, a job schedule
will be calculated with ballpark start and due dates for
each task.
The ballpark schedule function works best on new jobs that haven’t been scheduled before. The ballpark schedule replaces any start or due dates on the job ticket, erasing any dates you may have entered manually.
1 From the Job Schedule window, click the ballpark button.
The Create Ballpark Schedule dialog box opens, prompting you to select the start date or due date. For convenience, the job’s actual start date or due date can be updated here.
2 Choose start date or due date, then click OK.
You’ll see the job’s new start dates and due dates almost instantly. Ballpark scheduling is fast -- and you can still fine-tune one task or another until the schedule is perfect. None of the schedule’s dates are saved until you click Save, so you can freely edit the task’s dates and lead times.
To reschedule a job
It always seems to happen: you spend
hours creating a perfect, realistic schedule for a job
then the client postpones it a month. Instead of manually
changing each task’s start and due dates,
there’s an easy, automatic way to reschedule the
job. The Reschedule shortcut automatically rearranges a
job schedule around a new start date or due date. Each
task’s relative time (i.e., the days between its
start date and due date) is preserved -- only the dates
themselves are changed. While the Reschedule function
instantly reschedules the job, you can still manually
fine-tune the dates as needed.
Rescheduling a job schedule doesn’t check the shop’s workload for any particular day or week.
1 From the Job Schedule window, click the reschedule button.
The Reschedule Tasks dialog box prompts you to select a new start date or due date
.
2 Choose start date or due date, then click OK.
You’ll see the task’s new start dates and due dates almost instantly -- and you can still fine-tune one task or another until the schedule is perfect. None of the schedule’s dates are saved until you click Save, so you can freely edit the task’s dates and lead times. Any holidays entered into the job schedule preferences are automatically skipped.
To reassign someone’s deadlines
If the resource assigned to a job’s tasks can’t do the work (i.e., they’ve been moved to a different account team, they’ve quit, etc.), the resource’s tasks can be easily reassigned to someone else. The Reassign Deadlines shortcut swaps the old resource for the new one you’ll enter.
This shortcut only applies to tasks on one particular job. However, you can reassign all of the tasks assigned to a staff member (who quit, for example) to someone else using the Reassign Deadlines shortcut in the Staff Availability window.
1 From the Job Schedule window, click the reassign Deadlines button.
The Reassign Deadlines dialog box opens, prompting you to enter the old resource and the new resource. The resource for the currently selected task is entered automatically, but can be changed to any resource scheduled for this job.
2 Enter the old resource and the new resource, then click OK.
You’ll see the new resource replace the old resource on the job’s tasks almost instantly.
To view other deadlines for tasks, resources, or dates
Sometimes its helpful while scheduling to see other deadlines for a task, a resource, or some other date. Clients & Profits X makes it easy to see other deadlines without closing the Job Schedule window: the View Scheduled Tasks (click the button), View Tasks for Resource (click the button), and Unfinished Tasks (click the button) pop-up windows look up deadlines from other jobs by task, resource, or date. Deadlines are selected using the currently selected task, its resource, or its due date. These windows help you balance the shop’s workload by seeing what other tasks are due during the same time frame as the task you’re currently scheduling.