Free help: USER GUIDE
Home > Clients & Profits X User Guide > My > Add Client Meeting

|
Clients & Profits X Online User Guide |
Everything
you need to communicate about upcoming client meetings,
from directions to objectives, are recorded in the Add
Client Meeting window.
When adding client meetings, you can include as much detail as needed to help
everyone prepare for the meeting. With advance, automatic e-mail notification,
attendees can book the meeting and prep time well in advance.
New meetings will appear in the Meeting>Manager window, along with their
topic, status, attendees, and other information as soon as they are saved.
Your meeting objectives appear on the meeting worksheet, along with the date
and time, coordinator, directions, and attendees. (The meeting worksheet is
designed as an in-meeting handout, ideal for note-taking.)
The topic for the meeting appears in both the Meeting>Manager and the automatic
e-mails, so make sure it is descriptive. Including detailed meeting objectives
are a great way to communicate exactly what will be covered during the meeting.
Be sure to check the Notify all attendees via e-mail checkbox to send messages
to those people selected in the attendees list.
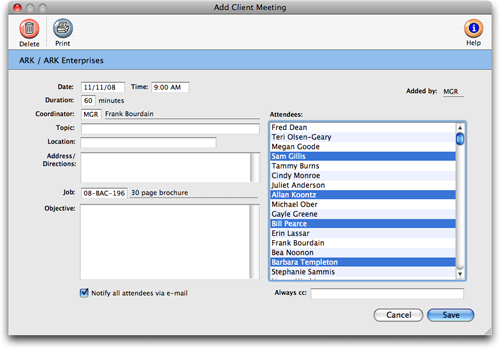
To schedule a new client meeting
1 From the Meeting>Manager window, click the add button
(or choose Edit > Add New Client Meeting).
The Add New Client Meeting window opens, prompting you to enter the meeting's
details.
2 Enter the date and time for the meeting.
Time is entered on a 24-hour clock (i.e., military time), but appears with
a 12-hour AM/PM configuration.
3 Enter the initials of the person coordinating the meeting.
Clients & Profits X automatically enters the initials of the person who
is adding the meeting as the coordinator.
4 Use the topic field to enter a brief description of what
the meeting is about.
The event description box, a free-form field, allows you to type in as much
information as you need to describe the planned event.
5 Enter the meeting's location.
The location is where the meeting will be held, such as a conference room,
hotel, or client’s office. Enter the location address and any necessary
information about getting there, such as parking, tricky exits, or other caveats.
6 If the meeting is about a particular job, enter its job
number here.
Because this isn’t required, the Lookup Job Tickets list won’t automatically
open, but you can access it by choosing Lookup > Job Tickets.
7 Enter the meeting's objectives.
This is important, since it helps everyone knows what the meeting's goals are
-- and helps the meeting stay focused.
8 Use your mouse to select the names of meeting's attendees.
The client's contacts appear in the top half of the list, your shop's staff
members in the bottom half. To choose several names, hold down the control
(Windows) or command (Mac) key.
9 Check the notify all attendees box to send an e-mail
to everyone who will be attending the meeting.
To send an e-mail to someone who isn’t on the attendees list, but needs
to know about the meeting, enter an e-mail address in the always cc field.
10 Click Save.
The status line will be blank until you click save. After saving, the meeting
status defaults to upcoming. The initials of the person who added the meeting
are automatically filled in.
Use the print button to print a meeting worksheet -- it's a great tool for keeping notes at the meeting and completing the meeting summary.
To delete a client meeting
Click on the delete button to completely remove information about the meeting from the database.
If the meeting is tentative, go ahead and schedule it, then mark it canceled later, or edit the date and time.